Friday, April 29, 2011

Setting Up

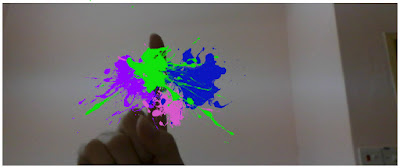
Here are some picture when I set up the installation. Picture quality is quite bad because taken from the video.


1. Set up projector.


2. Plug in the wires in my own desktop.


3. Stick the Arduino and vibration sensor under the board.


4. Friend help testing the installation.


5. Installation working perfectly.

Artist Statement

This installation is a combination of drum therapy, music therapy and art therapy to aid people in release stress. Through this installation, I hopes that users can experience a new way to express their feeling and daily stress with new media nowadays.

I was motivated by the news and people around me who cannot manage their stress efficiently. I also have my own stress to deal with every day. Stress have been an old issue for long time ago but people nowadays are getting worst in manage their daily tension. Stress is a pushing hand but it can be also a deadly poison for individual. People are working or study hard to pursue the luxury and survive in society but they forgot to slow down their living steps. And these bring to the cases related to mental health like depression, anxiety and insomnia, which increasing every day. In this installation users not only can express their feeling in his/her very own world but also help to find back their self-cognitive through the beating sound, music and colors.

Poster

The poster for my installation is finally comes out! Here is it:


Warning!!! Its hot!

Monday, April 25, 2011

Drum Sound in Flash

Putting a drum sound in flash is quite easy actually. But for me the challenge thing is to call out the drum sound using AS3. Luckily the experimental period is quite smooth. First, I import the packages that will be using in flash like below:


import flash.media.Sound;
import flash.media.SoundChannel;


After that, put the following action script under the private KeyPress function:


var my_sound:drumsound = new drumsound();
var my_channel:SoundChannel = new SoundChannel();

if (event.keyCode==Keyboard.SPACE) {
my_channel = my_sound.play();
}


Its done! Drum sound will come out when SPACE bar is press. Its time for final set up!!!!

Sunday, April 24, 2011

Arduino and Java - Part 2

Ok. The plan that modify the Java script inside Serial Midi Converter was failed. This is because one serial port can't have two kind of converter to convert the message. I have come out with another solution which the serial port only detect the keypress for SPACE and the drum sound will be played back inside flash. This is the last way for me to simplify the convert of signal received through serial port. The code that we'll using is the tutorial that i posted in previous post. I've seek help from my house mate who is also a IT student which good in coding and Java. This is the code after edit:


package serialtalk;

import java.io.InputStream;
import java.io.OutputStream;
import gnu.io.CommPortIdentifier;
import gnu.io.SerialPort;
import gnu.io.SerialPortEvent;
import gnu.io.SerialPortEventListener;
import java.util.Enumeration;
import java.awt.Robot;
import java.awt.event.KeyEvent;

public class Main implements SerialPortEventListener {
SerialPort serialPort;
static Robot robot;
/** The port we're normally going to use. */
private static final String PORT_NAMES[] = {
"/dev/tty.usbserial-A9007UX1", // Mac OS X
"/dev/ttyUSB0", // Linux
"COM11", // Windows
};
/** Buffered input stream from the port */
private InputStream input;
/** The output stream to the port */
private OutputStream output;
/** Milliseconds to block while waiting for port open */
private static final int TIME_OUT = 2000;
/** Default bits per second for COM port. */
private static final int DATA_RATE = 9600;

public void initialize() {
CommPortIdentifier portId = null;
Enumeration portEnum = CommPortIdentifier.getPortIdentifiers();

// iterate through, looking for the port
while (portEnum.hasMoreElements()) {
CommPortIdentifier currPortId = (CommPortIdentifier) portEnum.nextElement();
for (String portName : PORT_NAMES) {
if (currPortId.getName().equals(portName)) {
portId = currPortId;
break;
}
}
}

if (portId == null) {
System.out.println("Could not find COM port.");
return;
}

try {
// open serial port, and use class name for the appName.
serialPort = (SerialPort) portId.open(this.getClass().getName(),
TIME_OUT);

// set port parameters
serialPort.setSerialPortParams(DATA_RATE,
SerialPort.DATABITS_8,
SerialPort.STOPBITS_1,
SerialPort.PARITY_NONE);

// open the streams
input = serialPort.getInputStream();
output = serialPort.getOutputStream();

// add event listeners
serialPort.addEventListener(this);
serialPort.notifyOnDataAvailable(true);
} catch (Exception e) {
System.err.println(e.toString());
}
}

/**
* This should be called when you stop using the port.
* This will prevent port locking on platforms like Linux.
*/
public synchronized void close() {
if (serialPort != null) {
serialPort.removeEventListener();
serialPort.close();
}
}

/**
* Handle an event on the serial port. Read the data and print it.
*/
public synchronized void serialEvent(SerialPortEvent oEvent) {
System.out.println("\n *** [VIBRATION DETECTED] *** ");
//robot.mouseMove(0, 0);
robot.keyPress(KeyEvent.VK_SPACE);
if (oEvent.getEventType() == SerialPortEvent.DATA_AVAILABLE) {
try {
int available = input.available();
byte chunk[] = new byte[available];
input.read(chunk, 0, available);

// Displayed results are codepage dependent
System.out.print(new String(chunk));
} catch (Exception e) {
System.err.println(e.toString());
}
}
// Ignore all the other eventTypes, but you should consider the other ones.
}

public static void main(String[] args) throws Exception {
Main main = new Main();
robot = new Robot();

main.initialize();
System.out.println("Started");
}
}


We used "Robot" function to trigger the keypress "SPACE" once it detected signal received from Arduino board. "COM11" is the USB serial port that I'm using woth Arduino board. Every different computer will have different serial number for the port. So if the installation need to present at another computer, this is the one that need to be change according to the port number at that computer, and whole Java script will need to compile again. Below is the output in NetBean after it detect vibration signal in Arduino board:


It successfully to receive signal from Arduino! And after we test with the flash, it successfully to trigger SPACE key as well. This indeed is a big move toward the success in my installation. I want to thanks Jay Lim in helping me with his professional knowledge.

Thursday, April 21, 2011

Arduino and Java

I've found a tutorial online that related to virtual serial port writing. I've seek help from my house mate which is a IT student because this need a strong IT and Java programming knowledge. Firstly we installed the Netbean software as written in the tutorial:


After that, we import some Arduino IDE libraries and configurations:


After that, we put in the codes that given by the website:


package serialtalk;

import gnu.io.CommPortIdentifier;
import gnu.io.SerialPort;
import java.io.InputStream;
import java.io.OutputStream;
import processing.app.Preferences;

public class Main {
static InputStream input;
static OutputStream output;

public static void main(String[] args) throws Exception{
Preferences.init();
System.out.println("Using port: " + Preferences.get("serial.port"));
CommPortIdentifier portId = CommPortIdentifier.getPortIdentifier(
Preferences.get("serial.port"));

SerialPort port = (SerialPort)portId.open("serial talk", 4000);
input = port.getInputStream();
output = port.getOutputStream();
port.setSerialPortParams(Preferences.getInteger("serial.debug_rate"),
SerialPort.DATABITS_8,
SerialPort.STOPBITS_1,
SerialPort.PARITY_NONE);
while(true){
while(input.available()>0) {
System.out.print((char)(input.read()));
}
}
}
}


We programmed the java file inside Serial Midi Converter hope that when it receive the sound signal fron serial port, it will also trigger virtual space button so that the splash effects will be played. We've tried whole night in figuring where to put in VK_SPACE but it still no improvement. Time really flies that it already early in the morning after we spent so many time on it but show nothing. We will continue to do it after have a sleep first >.<...

Reference:
1. http://silveiraneto.net/2009/03/01/arduino-and-java/

Wednesday, April 20, 2011

Flash Stage Setting

Now I need to adjust the stage size and remove unnecessary items for my installation. As can see from previous post the output was divided into two part, webcam images and tracking image. Now I need to remove both output so that the effects project on body will be nice. Here are some codes that I've make them into comment that will skip these code from processing throughout the codes:


/*addChild(_blurSlider);
addChild(_blurLabel);

addChild(_brightnessSlider);
addChild(_brightnessLabel);

addChild(_contrastSlider);
addChild(_contrastLabel);

addChild(_minAreaSlider);
addChild(_minAreaLabel);*/

// Show the image the MotionTracker is processing and using to track
_output = new Bitmap(_motionTracker.trackingImage);
_output.x = camW + 20;
_output.y = 10;
//addChild(_output);

// Configure the UI
//_blurSlider.addEventListener(Event.CHANGE, onComponentChanged);
//_brightnessSlider.addEventListener(Event.CHANGE, onComponentChanged);
//_contrastSlider.addEventListener(Event.CHANGE, onComponentChanged);
//_minAreaSlider.addEventListener(Event.CHANGE, onComponentChanged);

/*private function applyFilters() : void
{
_blurLabel.text = "Blur: " + Math.round(_blurSlider.value);
_brightnessLabel.text = "Brightness: " + Math.round(_brightnessSlider.value);
_contrastLabel.text = "Contrast: " + Math.round(_contrastSlider.value);
_minAreaLabel.text = "Min Area: " + Math.round(_minAreaSlider.value);

_matrix.reset();
_matrix.adjustContrast(_contrastSlider.value);
_matrix.adjustBrightness(_brightnessSlider.value);
_source.filters = [new ColorMatrixFilter(_matrix)];
}*/


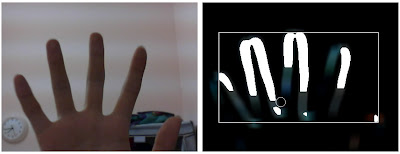
This is how it looks like after the modify:

Randomize Splashing Effect - Part 2

I've consult lecturer about the AS3 array code for my splashing effect.

This is the original code:


// A shape to represent the tracking point
_target = new Shape();
_target.graphics.lineStyle(0, 0xFFFFFF);
_target.graphics.drawCircle(0, 0, 10);
addChild(_target);
addChild(round);


After test the array, lecturer decided to use manual calling to call out the movie clip because array cannot duplicate the element in it. And this is the code after edited by lecturer:


// A shape to represent the tracking point
_target = new Shape();
_target.graphics.lineStyle(0, 0xFFFFFF);
_target.graphics.drawCircle(0, 0, 10);
addChild(_target);
addChild(round1);
addChild(round2);
addChild(round3);
addChild(round4);
addChild(round5);


Everything went manual afterwards. Here are the codes for manually color changing for each movie clip:


private function changeColor(){
//random color value
col = Math.random()*0xffffff;
cTransform.color = col;
//round.transform.colorTransform = cTransform;
if(counter==1){
round1.transform.colorTransform = cTransform;
}else if(counter==2){
round2.transform.colorTransform = cTransform;
}else if(counter==3){
round3.transform.colorTransform = cTransform;
}else if(counter==4){
round4.transform.colorTransform = cTransform;
}else if(counter==5){
round5.transform.colorTransform = cTransform;
}
}


This is the random calling for the all types of splashing effects:


private function keyDownHandler(event : KeyboardEvent):void
{
if (event.keyCode==Keyboard.SPACE) {
//round.gotoAndPlay(2);
counter = Math.round(Math.random()*5)+1;


if(counter>5){
counter = 0;
}
trace("counter="+counter);
changeColor();
if(counter==1){
round1.gotoAndPlay(2);
trace("round1");
}
if(counter==2){
round2.gotoAndPlay(2);
trace("round2");
}
if(counter==3){
round3.gotoAndPlay(2);
trace("round3");
}
if(counter==4){
round4.gotoAndPlay(2);
trace("round4");
}
if(counter==5){
round5.gotoAndPlay(2);
trace("round5");
}

}
}


And below is the random x and y coordinate for the movie clip around the motion detection. It is seem random but actually it is actually manually random.


// Draw the motion bounds so we can see what the MotionTracker is doing
_bounds.graphics.clear();
_bounds.graphics.lineStyle(0, 0xFFFFFF);
_bounds.graphics.drawRect(_motionTracker.motionArea.x, _motionTracker.motionArea.y, _motionTracker.motionArea.width, _motionTracker.motionArea.height);
var x1:Number;
var y1:Number;
var x2:Number;
var y2:Number;
var x3:Number;
var y3:Number;
var x4:Number;
var y4:Number;
var x5:Number;
var y5:Number;
if(counter==1){
x1 = -50;
y1 = 0;
x2 = 20;
y2 = 45;
x3 = 50;
y3 = 10;
x4 = 0;
y4 = 100;
x5 = -10;
y5 = -10;
}else if(counter==2){
x1 = -10;
y1 = 10;
x2 = -50;
y2 = 30;
x3 = 70;
y3 = -25;
x4 = 30;
y4 = -5;
x5 = 0;
y5 = 24;
}else if(counter==3){
x1 = 70;
y1 = -10;
x2 = -30;
y2 = -32;
x3 = -5;
y3 = 45;
x4 = 55;
y4 = 10;
x5 = -60;
y5 = -10;
}else if(counter==4){
x1 = 20;
y1 = -50;
x2 = -5;
y2 = 15;
x3 = -40;
y3 = 10;
x4 = -25;
y4 = -10;
x5 = 40;
y5 = -100;
}else if(counter==5){
x1 = 0;
y1 = 65;
x2 = 50;
y2 = 0;
x3 = 20;
y3 = -20;
x4 = -35;
y4 = 20;
x5 = -10;
y5 = -5;
}

round1.x = _motionTracker.motionArea.x+x1+(_motionTracker.motionArea.width/2);
round1.y = _motionTracker.motionArea.y+y1+(_motionTracker.motionArea.height/2);
round2.x = _motionTracker.motionArea.x+x2+(_motionTracker.motionArea.width/2);
round2.y = _motionTracker.motionArea.y+y2+(_motionTracker.motionArea.height/2);
round3.x = _motionTracker.motionArea.x+x3+(_motionTracker.motionArea.width/2);
round3.y = _motionTracker.motionArea.y+y3+(_motionTracker.motionArea.height/2);
round4.x = _motionTracker.motionArea.x+x4+(_motionTracker.motionArea.width/2);
round4.y = _motionTracker.motionArea.y+y4+(_motionTracker.motionArea.height/2);
round5.x = _motionTracker.motionArea.x+x5+(_motionTracker.motionArea.width/2);
round5.y = _motionTracker.motionArea.y+y5+(_motionTracker.motionArea.height/2);

trace(round1.x);
trace(round1.y);
trace(round2.x);
trace(round2.y);
trace(round3.x);
trace(round3.y);
trace(round4.x);
trace(round4.y);
trace(round5.x);
trace(round5.y);

if ( !_motionTracker.hasMovement ) return;
}


After a long long coding time, here is finally the output for the installation! Wohoo! Thanks my lecturer Mr. Hafiz in helping me to make this thing works.


This still isn't the very last of my installation. I still need to program the code in Arduino to create virtual key for serial port so that SPACE key will be detected as well when vibration in detected. Add Oil!!!!

Thursday, April 14, 2011

Randomize Splashing Effect

After put in flash effect, next step is to randomize the splashing effect around motion detection. I've found some code online for the randomize array thing in AS3. I decided to make a tutorial first before import into main splashing effect flash code. Here is the code for randomize array I've found online:


//Create an empty Array with the name movieArray
var movieArray:Array = new Array();

//Put the MovieClips into the Array
//The size of this Array is now 3
movieArray = ["Tree", "Sun", "FootBall"];

// Declare variable to use later
var myMovieClip:MovieClip;
if ((movieArray[Math.floor(Math.random() * 3)]) == "Tree") {
// Create a new MovieClip
myMovieClip = new Tree();
output_txt.text = "The Tree MovieClip was added!";
} else if ((movieArray[Math.floor(Math.random() * 3)]) == "Sun") {
// Create a new MovieClip
myMovieClip = new Sun();
output_txt.text = "The Sun MovieClip was added!";
} else if ((movieArray[Math.floor(Math.random() * 3)]) == "FootBall") {
// Create a new MovieClip
myMovieClip = new FootBall();
output_txt.text = "The FootBall MovieClip was added!";
} else { // In case the random number is 1
myMovieClip = new FootBall();
output_txt.text = "The FootBall MovieClip was added!";
}

// Add the new MovieClip to the empty MovieClip
// so that we can see it.
emptyMC_mc.addChild(myMovieClip);

// Set the location if required
//emptyMC_mc.x = 250;
//emptyMC_mc.y = 210;


And below is the tutorial I've done after modify the code:


import flash.ui.Keyboard;
import flash.events.KeyboardEvent;

//Create an empty Array with the name movieArray
var Splash:Array = new Array();

//Put the MovieClips into the Array
//The size of this Array is now 3
Splash=["sp1","sp2","sp3"];

// Declare variable to use later
var myMovieClip:MovieClip;

stage.addEventListener(KeyboardEvent.KEY_DOWN, keyDownHandler);
function keyDownHandler(event : KeyboardEvent):void {
if (event.keyCode==Keyboard.SPACE) {
if ((Splash[Math.floor(Math.random() * 3)]) == "sp1") {
// Create a new MovieClip
myMovieClip = new sp1();
} else if ((Splash[Math.floor(Math.random() * 3)]) == "sp2") {
// Create a new MovieClip
myMovieClip = new sp2();
} else if ((Splash[Math.floor(Math.random() * 3)]) == "sp3") {
// Create a new MovieClip
myMovieClip = new sp3();
} else {// In case the random number is 1
myMovieClip = new sp1();
}
// Add the new MovieClip to the empty MovieClip
// so that we can see it.
emptyMC_mc.addChild(myMovieClip);
emptyMC_mc.x = Math.round(Math.random() * stage.width);
emptyMC_mc.y = Math.round(Math.random() * stage.height);
}
}


I've success to make the splash come out but it call out all 3 movie clip and the only random is the sequence in calling different movie clip. After I try to put into the main code it shows a lot of error. I've tried few days in correcting the code but it still show no improvement. I decided to consult lecturer after that. Below is the output for tutorial.


Reference:
1. http://www.republicofcode.com/tutorials/flash/as3arrays/
2. http://www.kirupa.com/forum/showthread.php?t=308712
3. http://www.flashessential.com/archives/60
4. http://www.flashwonderland.com/load-library-movieclip/load-mc-3.html

Tuesday, April 12, 2011

Flash Splashing Effects

I've found a flash motion tracking tutorial for use in my installation. The language that used in this tutorial is AS3.0, which is totally different from the AS2.0 that I've learnt, so it is quite difficult for me to understand and its time consuming. This is the original output and codes:


/**
*
* MotionTrackerDemo
*
* @version 1.00 | Apr 2, 2008
* @author Justin Windle
*
**/

package
{
import uk.co.soulwire.cv.MotionTracker;

/**
* I'm using Grant Skinners fantastic ColorMatrix class:
* http://www.gskinner.com/blog/archives/2007/12/colormatrix_upd.html
*
* And Keith Peters Minimal Components:
* http://www.bit-101.com/minimalcomps/
*/

import com.bit101.components.Label;
import com.bit101.components.Slider;
import com.gskinner.geom.ColorMatrix;

import flash.display.Bitmap;
import flash.display.BitmapData;
import flash.display.Shape;
import flash.display.Sprite;
import flash.events.Event;
import flash.filters.ColorMatrixFilter;
import flash.media.Camera;
import flash.media.Video;

/**
* MotionTrackerDemo
*/

[SWF(width="870", height="420", backgroundColor="#FFFFFF", frameRate="31")]

public class MotionTrackerDemo extends Sprite
{

// ----------------------------------------------------------------
// PRIVAYE MEMBERS
// ----------------------------------------------------------------

private var _motionTracker : MotionTracker;

private var _target : Shape;
private var _bounds : Shape;
private var _output : Bitmap;
private var _source : Bitmap;
private var _video : BitmapData;
private var _matrix : ColorMatrix;

private var _blurLabel : Label = new Label();
private var _brightnessLabel : Label = new Label();
private var _contrastLabel : Label = new Label();
private var _minAreaLabel : Label = new Label();

private var _blurSlider : Slider = new Slider();
private var _brightnessSlider : Slider = new Slider();
private var _contrastSlider : Slider = new Slider();
private var _minAreaSlider : Slider = new Slider();

// ----------------------------------------------------------------
// CONSTRUCTOR
// ----------------------------------------------------------------

public function MotionTrackerDemo()
{
addEventListener(Event.ADDED_TO_STAGE, onAddedToStage);
}

// ----------------------------------------------------------------
// PRIVATE METHODS
// ----------------------------------------------------------------

private function configureUI() : void
{
_blurSlider.minimum = 0;
_blurSlider.maximum = 40;

_brightnessSlider.minimum = -100;
_brightnessSlider.maximum = 100;

_contrastSlider.minimum = -100;
_contrastSlider.maximum = 200;

_minAreaSlider.minimum = 0;
_minAreaSlider.maximum = 50;

_blurSlider.x = _blurLabel.x = 10;
_blurSlider.y = stage.stageHeight - 20;
_blurLabel.y = _blurSlider.y - 20;

_brightnessSlider.x = _brightnessLabel.x = _blurSlider.x + 110;
_brightnessSlider.y = _blurSlider.y;
_brightnessLabel.y = _brightnessSlider.y - 20;

_contrastSlider.x = _contrastLabel.x = _brightnessSlider.x + 110;
_contrastSlider.y = _blurSlider.y;
_contrastLabel.y = _contrastSlider.y - 20;

_minAreaSlider.x = _minAreaLabel.x = _contrastSlider.x + 110;
_minAreaSlider.y = _blurSlider.y;
_minAreaLabel.y = _minAreaSlider.y - 20;

addChild(_blurSlider);
addChild(_blurLabel);

addChild(_brightnessSlider);
addChild(_brightnessLabel);

addChild(_contrastSlider);
addChild(_contrastLabel);

addChild(_minAreaSlider);
addChild(_minAreaLabel);
}

private function initTracking() : void
{
var camW : int = 420;
var camH : int = 320;

// Create the camera
var cam : Camera = Camera.getCamera();
cam.setMode(camW, camH, stage.frameRate);

// Create a video
var vid : Video = new Video(camW, camH);
vid.attachCamera(cam);

// Create the Motion Tracker
_motionTracker = new MotionTracker(vid);

// We flip the input as we want a mirror image
_motionTracker.flipInput = true;

/*** Create a few things to help us visualise what the MotionTracker is doing... ***/

_matrix = new ColorMatrix();
_matrix.brightness = _motionTracker.brightness;
_matrix.contrast = _motionTracker.contrast;

// Display the camera input with the same filters (minus the blur) as the MotionTracker is using
_video = new BitmapData(camW, camH, false, 0);
_source = new Bitmap(_video);
_source.scaleX = -1;
_source.x = 10 + camW;
_source.y = 10;
_source.filters = [new ColorMatrixFilter(_matrix.toArray())];
addChild(_source);

// Show the image the MotionTracker is processing and using to track
_output = new Bitmap(_motionTracker.trackingImage);
_output.x = camW + 20;
_output.y = 10;
addChild(_output);

// A shape to represent the tracking point
_target = new Shape();
_target.graphics.lineStyle(0, 0xFFFFFF);
_target.graphics.drawCircle(0, 0, 10);
addChild(_target);

// A box to represent the activity area
_bounds = new Shape();
_bounds.x = _output.x;
_bounds.y = _output.y;
addChild(_bounds);

// Configure the UI
_blurSlider.addEventListener(Event.CHANGE, onComponentChanged);
_brightnessSlider.addEventListener(Event.CHANGE, onComponentChanged);
_contrastSlider.addEventListener(Event.CHANGE, onComponentChanged);
_minAreaSlider.addEventListener(Event.CHANGE, onComponentChanged);

// Get going!
addEventListener(Event.ENTER_FRAME, onEnterFrameHandler);
}

private function applyFilters() : void
{
_blurLabel.text = "Blur: " + Math.round(_blurSlider.value);
_brightnessLabel.text = "Brightness: " + Math.round(_brightnessSlider.value);
_contrastLabel.text = "Contrast: " + Math.round(_contrastSlider.value);
_minAreaLabel.text = "Min Area: " + Math.round(_minAreaSlider.value);

_matrix.reset();
_matrix.adjustContrast(_contrastSlider.value);
_matrix.adjustBrightness(_brightnessSlider.value);
_source.filters = [new ColorMatrixFilter(_matrix)];
}

// ----------------------------------------------------------------
// EVENT HANDLERS
// ----------------------------------------------------------------

private function onAddedToStage(event : Event) : void
{
configureUI();
initTracking();
applyFilters();
}

private function onEnterFrameHandler(event : Event) : void
{
// Tell the MotionTracker to update itself
_motionTracker.track();

// Move the target with some easing
_target.x += ((_motionTracker.x + _bounds.x) - _target.x) / 10;
_target.y += ((_motionTracker.y + _bounds.y) - _target.y) / 10;

_video.draw(_motionTracker.input);

// If there is enough movement (see the MotionTracker's minArea property) then continue
if ( !_motionTracker.hasMovement ) return;

// Draw the motion bounds so we can see what the MotionTracker is doing
_bounds.graphics.clear();
_bounds.graphics.lineStyle(0, 0xFFFFFF);
_bounds.graphics.drawRect(_motionTracker.motionArea.x, _motionTracker.motionArea.y, _motionTracker.motionArea.width, _motionTracker.motionArea.height);
}

private function onComponentChanged(event : Event) : void
{
switch(event.target)
{
case _blurSlider :

_motionTracker.blur = _blurSlider.value;

break;

case _brightnessSlider :

_motionTracker.brightness = _brightnessSlider.value;

break;

case _contrastSlider :

_motionTracker.contrast = _contrastSlider.value;

break;

case _minAreaSlider :

_motionTracker.minArea = _minAreaSlider.value;

break;
}

applyFilters();
}
}
}


First I import the images that I've create for the splash animation. The color of my original images for splash effect is set every time it detect input. So I've found some code online to make the color change randomly every time it detect input. Here is the codes I've found online:


myColor = Math.round( Math.random()*0xFFFFFF );
myColoredObject = new Color (_root.square);
myColoredObject.setRGB(myColor);


In order to call the movie clip, I must have key in an order to make the effect appear. I've used the keyboard SPACE button as the input. Here is the AS3 keyPress codes that I've found online:


this.stage.addListener(KeyboardEvent.KEY_DOWN, keyDownHandler);
function keyDownHandler(event : KeyboardEvent) : void
{
if (event.keyCode == Keyboard.ENTER)
{
submit();
}
}


There are some problems on the code. After I google around the forum online, I've found that the source of the problem and this is the code after correction:


stage.addEventListener(KeyboardEvent.KEY_DOWN, keyDownHandler);
function keyDownHandler(event : KeyboardEvent) : void
{
if (event.keyCode == Keyboard.SPACE)
{
round.gotoAndPlay(2);
}
}


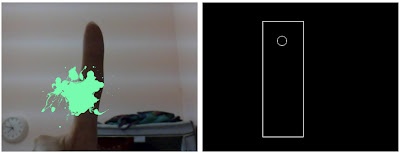
Here is the output images after I put in the codes above:


Reference:
1. http://blog.soulwire.co.uk/code/actionscript-3/webcam-motion-detection-tracking
2. http://www.kirupa.com/developer/actionscript/tricks/randomcolor.htm
3. http://www.actionscript.org/forums/showthread.php3?t=160251

Sunday, April 10, 2011

Mess Up with Arduino! Digital Vibrate Sensor Part 2

After some experiment, here is the final look of my Arduino Vibrate Sensor:


Here is the code for upload into Arduino chip:


// ranges from 0-15
#define drumchan 1

// general midi drum notes
#define note_bassdrum 36

// define the pins we use
#define switchAPin 3
#define piezoAPin 0
#define ledPin 13 // for midi out status

// analog threshold for piezo sensing
#define PIEZOTHRESHOLD 100

int switchAState = LOW;
int currentSwitchState = LOW;
int val,t;

unsigned char state = 0;

void setup() {
pinMode(switchAPin, INPUT);
digitalWrite(switchAPin, HIGH); // turn on internal pullup

pinMode(ledPin, OUTPUT);
Serial.begin(57600); // set MIDI baud rate
}

void loop() {
// deal with switchA
currentSwitchState = digitalRead(switchAPin);
if( currentSwitchState == LOW && switchAState == HIGH ) // push
noteOn(drumchan, note_bassdrum, 100);
if( currentSwitchState == HIGH && switchAState == LOW ) // release
noteOff(drumchan, note_bassdrum, 0);
switchAState = currentSwitchState;

// deal with first piezo, this is kind of a hack
val = analogRead(piezoAPin);
if( val >= PIEZOTHRESHOLD ) {
t=0;
while(analogRead(piezoAPin) >= PIEZOTHRESHOLD/2) {
t++;
}
}
}

// channel ranges from 0-15
void noteOn(byte channel, byte note, byte velocity) {
midiMsg( (0x99 | channel), note, velocity);
}

// Send a MIDI note-off message. Like releasing a piano key
void noteOff(byte channel, byte note, byte velocity) {
midiMsg( (0x89 | channel), note, velocity);
}

// Send a general MIDI message
void midiMsg(byte cmd, byte data1, byte data2) {
digitalWrite(ledPin,HIGH); // indicate we're sending MIDI data
Serial.print(cmd, BYTE);
Serial.print(data1, BYTE);
Serial.print(data2, BYTE);
digitalWrite(ledPin,LOW);
}

void blink()//Interrupts function
{
state++;
}


The problem that the output is piano sound because of the wrong channel of midi sound. This is the piano sound code:


// channel ranges from 0-15
void noteOn(byte channel, byte note, byte velocity) {
midiMsg( (0x90 | channel), note, velocity);
}


The channel for percussion type instrument sound is 9. So I've modify the code like below:


// channel ranges from 0-15
void noteOn(byte channel, byte note, byte velocity) {
midiMsg( (0x99 | channel), note, velocity);
}


And wohoo! Drum sound is finally comes out! Although the sound is not very nice when played, and there are some codes still need to modify further, this is a big step toward my success!

Reference:
1. http://www.pjb.com.au/muscript/gm.html#perc
2. http://todbot.com/blog/2006/10/29/spooky-arduino-projects-4-and-musical-arduino/
3. http://todbot.com/arduino/sketches/midi_drum_kit/midi_drum_kit.pde

Sunday, April 3, 2011

Mess Up with Arduino! Digital Vibrate Sensor

Today I tested Arduino with digital vibrate sensor. I was first planned to use pressure sensor as the device to detect person who standing on the board but I think that knock sensor or vibrate sensor is best to use in my installation. Below is the arrangement of the digital vibrate sensor.


After I put in the code found online, I managed to make the whole thing function. Below is the photo which LED light up when detect vibration on the table surface.


After that, I add in some more code which will send the signal to analog port when detect vibration. I've downloaded Serial Midi Converter which will convert the signal received into various sound like piano, drum etc. I managed to program the board to produce piano sound but not drum sound. Drum is the main sound that will be used in my installation. It is first step to success although it is not drum sound but piano sound. I'll study the code again... to be continue...

Friday, April 1, 2011

Mess Up with Arduino! Knock Sensor

There are few sensors that I've been considering to use in my installation. I'll test on the sensitivity and usability on different sensor. The sensor that I've been tested is knock sensor. I started with the tutorial in Arduino website. This is the basic arrangement of the knock sensor:


This is the code I've used to test on the knock sensor:

================================================================================
// these constants won't change:
const int ledPin = 13; // led connected to digital pin 13
const int knockSensor = A0; // the piezo is connected to analog pin 0
const int threshold = 100; // threshold value to decide when the detected sound is a knock or not


// these variables will change:
int sensorReading = 0; // variable to store the value read from the sensor pin
int ledState = LOW; // variable used to store the last LED status, to toggle the light

void setup() {
pinMode(ledPin, OUTPUT); // declare the ledPin as as OUTPUT
Serial.begin(9600); // use the serial port
}

void loop() {
// read the sensor and store it in the variable sensorReading:
sensorReading = analogRead(knockSensor);

// if the sensor reading is greater than the threshold:
if (sensorReading >= threshold) {
// toggle the status of the ledPin:
ledState = !ledState;
// update the LED pin itself:
digitalWrite(ledPin, ledState);
// send the string "Knock!" back to the computer, followed by newline
Serial.println("Knock!");
}
delay(100); // delay to avoid overloading the serial port buffer
}
================================================================================

I've followed all the instruction and arrangement as stated in the tutorial but I failed to make the knock sensor function. I've tested it over and over again but it react nothing. I thought that I might have burnt the knock sensor but it is quite impossible because the circuit is very simple and all installed as the image in tutorial. So I decided to try on the knock sensor which borrowed from my friend, Stefan. The experiment still show no result. I've tried with the different code from internet and there is still no improvement. So I just leave with the knock sensor first and test with other sensor. This experiment: FAILED!