I've download a motion tracking tutorial from the link below:
http://blog.soulwire.co.uk/code/actionscript-3/webcam-motion-detection-trackingBefore that I've get a motion tracking tutorial copy also from lecturer. I want to compare 2 version on the sensitivity in tracking body movement. Below are the original code from the tutorial:
================================================================================
/**
*
* MotionTrackerDemo
*
* @version 1.00 | Apr 2, 2008
* @author Justin Windle
*
**/
package
{
import uk.co.soulwire.cv.MotionTracker;
/**
* I'm using Grant Skinners fantastic ColorMatrix class:
* http://www.gskinner.com/blog/archives/2007/12/colormatrix_upd.html
*
* And Keith Peters Minimal Components:
* http://www.bit-101.com/minimalcomps/
*/
import com.bit101.components.Label;
import com.bit101.components.Slider;
import com.gskinner.geom.ColorMatrix;
import flash.display.Bitmap;
import flash.display.BitmapData;
import flash.display.Shape;
import flash.display.Sprite;
import flash.events.Event;
import flash.filters.ColorMatrixFilter;
import flash.media.Camera;
import flash.media.Video;
/**
* MotionTrackerDemo
*/
[SWF(width="870", height="420", backgroundColor="#FFFFFF", frameRate="31")]
public class MotionTrackerDemo extends Sprite
{
// ----------------------------------------------------------------
// PRIVAYE MEMBERS
// ----------------------------------------------------------------
private var _motionTracker : MotionTracker;
private var _target : Shape;
private var _bounds : Shape;
private var _output : Bitmap;
private var _source : Bitmap;
private var _video : BitmapData;
private var _matrix : ColorMatrix;
private var _blurLabel : Label = new Label();
private var _brightnessLabel : Label = new Label();
private var _contrastLabel : Label = new Label();
private var _minAreaLabel : Label = new Label();
private var _blurSlider : Slider = new Slider();
private var _brightnessSlider : Slider = new Slider();
private var _contrastSlider : Slider = new Slider();
private var _minAreaSlider : Slider = new Slider();
// ----------------------------------------------------------------
// CONSTRUCTOR
// ----------------------------------------------------------------
public function MotionTrackerDemo()
{
addEventListener(Event.ADDED_TO_STAGE, onAddedToStage);
}
// ----------------------------------------------------------------
// PRIVATE METHODS
// ----------------------------------------------------------------
private function configureUI() : void
{
_blurSlider.minimum = 0;
_blurSlider.maximum = 40;
_brightnessSlider.minimum = -100;
_brightnessSlider.maximum = 100;
_contrastSlider.minimum = -100;
_contrastSlider.maximum = 200;
_minAreaSlider.minimum = 0;
_minAreaSlider.maximum = 50;
_blurSlider.x = _blurLabel.x = 10;
_blurSlider.y = stage.stageHeight - 20;
_blurLabel.y = _blurSlider.y - 20;
_brightnessSlider.x = _brightnessLabel.x = _blurSlider.x + 110;
_brightnessSlider.y = _blurSlider.y;
_brightnessLabel.y = _brightnessSlider.y - 20;
_contrastSlider.x = _contrastLabel.x = _brightnessSlider.x + 110;
_contrastSlider.y = _blurSlider.y;
_contrastLabel.y = _contrastSlider.y - 20;
_minAreaSlider.x = _minAreaLabel.x = _contrastSlider.x + 110;
_minAreaSlider.y = _blurSlider.y;
_minAreaLabel.y = _minAreaSlider.y - 20;
addChild(_blurSlider);
addChild(_blurLabel);
addChild(_brightnessSlider);
addChild(_brightnessLabel);
addChild(_contrastSlider);
addChild(_contrastLabel);
addChild(_minAreaSlider);
addChild(_minAreaLabel);
}
private function initTracking() : void
{
var camW : int = 420;
var camH : int = 320;
// Create the camera
var cam : Camera = Camera.getCamera();
cam.setMode(camW, camH, stage.frameRate);
// Create a video
var vid : Video = new Video(camW, camH);
vid.attachCamera(cam);
// Create the Motion Tracker
_motionTracker = new MotionTracker(vid);
// We flip the input as we want a mirror image
_motionTracker.flipInput = true;
/*** Create a few things to help us visualise what the MotionTracker is doing... ***/
_matrix = new ColorMatrix();
_matrix.brightness = _motionTracker.brightness;
_matrix.contrast = _motionTracker.contrast;
// Display the camera input with the same filters (minus the blur) as the MotionTracker is using
_video = new BitmapData(camW, camH, false, 0);
_source = new Bitmap(_video);
_source.scaleX = -1;
_source.x = 10 + camW;
_source.y = 10;
_source.filters = [new ColorMatrixFilter(_matrix.toArray())];
addChild(_source);
// Show the image the MotionTracker is processing and using to track
_output = new Bitmap(_motionTracker.trackingImage);
_output.x = camW + 20;
_output.y = 10;
addChild(_output);
// A shape to represent the tracking point
_target = new Shape();
_target.graphics.lineStyle(0, 0xFFFFFF);
_target.graphics.drawCircle(0, 0, 10);
addChild(_target);
// A box to represent the activity area
_bounds = new Shape();
_bounds.x = _output.x;
_bounds.y = _output.y;
addChild(_bounds);
// Configure the UI
_blurSlider.addEventListener(Event.CHANGE, onComponentChanged);
_brightnessSlider.addEventListener(Event.CHANGE, onComponentChanged);
_contrastSlider.addEventListener(Event.CHANGE, onComponentChanged);
_minAreaSlider.addEventListener(Event.CHANGE, onComponentChanged);
// Get going!
addEventListener(Event.ENTER_FRAME, onEnterFrameHandler);
}
private function applyFilters() : void
{
_blurLabel.text = "Blur: " + Math.round(_blurSlider.value);
_brightnessLabel.text = "Brightness: " + Math.round(_brightnessSlider.value);
_contrastLabel.text = "Contrast: " + Math.round(_contrastSlider.value);
_minAreaLabel.text = "Min Area: " + Math.round(_minAreaSlider.value);
_matrix.reset();
_matrix.adjustContrast(_contrastSlider.value);
_matrix.adjustBrightness(_brightnessSlider.value);
_source.filters = [new ColorMatrixFilter(_matrix)];
}
// ----------------------------------------------------------------
// EVENT HANDLERS
// ----------------------------------------------------------------
private function onAddedToStage(event : Event) : void
{
configureUI();
initTracking();
applyFilters();
}
private function onEnterFrameHandler(event : Event) : void
{
// Tell the MotionTracker to update itself
_motionTracker.track();
// Move the target with some easing
_target.x += ((_motionTracker.x + _bounds.x) - _target.x) / 10;
_target.y += ((_motionTracker.y + _bounds.y) - _target.y) / 10;
_video.draw(_motionTracker.input);
// If there is enough movement (see the MotionTracker's minArea property) then continue
if ( !_motionTracker.hasMovement ) return;
// Draw the motion bounds so we can see what the MotionTracker is doing
_bounds.graphics.clear();
_bounds.graphics.lineStyle(0, 0xFFFFFF);
_bounds.graphics.drawRect(_motionTracker.motionArea.x, _motionTracker.motionArea.y, _motionTracker.motionArea.width, _motionTracker.motionArea.height);
}
private function onComponentChanged(event : Event) : void
{
switch(event.target)
{
case _blurSlider :
_motionTracker.blur = _blurSlider.value;
break;
case _brightnessSlider :
_motionTracker.brightness = _brightnessSlider.value;
break;
case _contrastSlider :
_motionTracker.contrast = _contrastSlider.value;
break;
case _minAreaSlider :
_motionTracker.minArea = _minAreaSlider.value;
break;
}
applyFilters();
}
}
}================================================================================
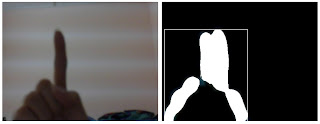
The original tutorial doesn't have any effect displayed on the right side. Below is the original testing:
I've refer to the tutorial that have been given by lecturer and add in a circle and extra code the original code:
================================================================================
_target = new Shape();
_target.graphics.lineStyle(0, 0xFFFFFF);
_target.graphics.drawCircle(0, 0, 10);
addChild(_target);
addChild(round);
_bounds.graphics.clear();
_bounds.graphics.lineStyle(0, 0xFFFFFF);
_bounds.graphics.drawRect(_motionTracker.motionArea.x, _motionTracker.motionArea.y, _motionTracker.motionArea.width, _motionTracker.motionArea.height);
round.x = _motionTracker.motionArea.x+(_motionTracker.motionArea.width/2);
round.y = _motionTracker.motionArea.y+(_motionTracker.motionArea.height/2);;
trace(round.x);
}================================================================================
The problem now is the circle will move upward and downward according to movement. I've remove the y-axis detection in the code and become like this:
_bounds.graphics.clear();
_bounds.graphics.lineStyle(0, 0xFFFFFF);
_bounds.graphics.drawRect(_motionTracker.motionArea.x, _motionTracker.motionArea.y, _motionTracker.motionArea.width, _motionTracker.motionArea.height);
round.x = _motionTracker.motionArea.x+(_motionTracker.motionArea.width/2);
trace(round.x);
}================================================================================
The circle is now move according to the movement of my hand and it only move in the x-axis and fixed y-axis. Below is the testing:
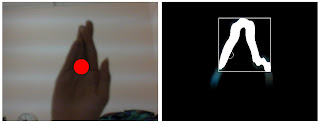
The circle will be replaced with the color splashing effect which will project on the user's body.


